


Photo by John Schnoon on Unsplash
Amazon MWAA (Managed Workflow for Apache Airflow) was released by AWS at the end of 2020. This brand new service provides a managed solution to deploy Apache Airflow in the cloud, making it easy to build and manage data processing workflows in AWS.
MWAA enables automatic deployment of all the infrastructure and configuration for Airflow Web Server, Scheduler, Workers, Metadata Database and also the Celery executor combined with SQS, to manage jobs dispatching. Users just need to setup an S3 bucket for DAGs, plugins and Python dependencies (via requirements.txt) and associate its content with the MWAA environment.
Authentication is also managed by AWS — native integration with IAM and resources can be deployed inside a private VPC for additional security.
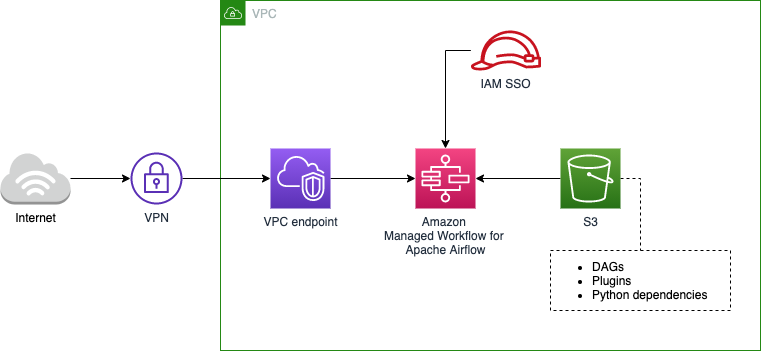
Example of an Amazon MWAA architecture deployed inside a VPC
Since all the resources are deployed by AWS, developers don’t have access to the underlying infrastructure. Consequently, the main interface used by Data Engineers is the Airflow UI, which is available via public URL or VPC endpoint, depending on the deployment type selected (public or private network).
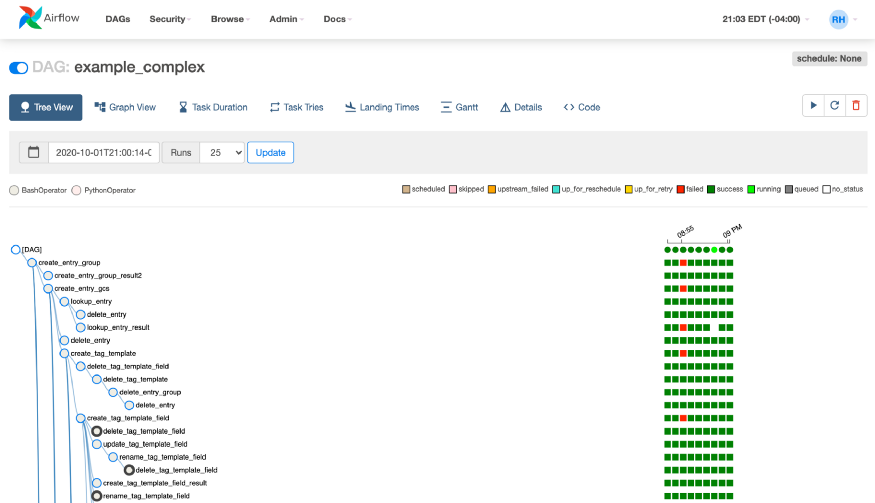
Example of DAG managed via Airflow UI
However, Airflow UI is not the only option for interacting with your environment; MWAA also provides support to the Airflow CLI. This is a useful option if you want to automate operations to monitor or trigger your DAGs, and in this post I explain how you can best make use of Airflow CLI from an MWAA environment.
The following content is suitable for those already familiar with the benefits and functionality of Apache Airflow. If you are new to Airflow, or you’re searching for more insights about the advantages of using Amazon MWAA compared to hosting your own environment, I recommend you explore earlier posts on this subject before reading on.
The Apache Airflow CLI and its use with Amazon MWAA
Airflow has a very rich command-line interface that allows for many types of operation on DAGs, starting services, and support for development and testing.
Airflow CLI is an interesting maintenance alternative within MWAA, since it allows Data Engineers to create scripts to automate otherwise manual/ repetitive tasks.
In MWAA, not all commands are supported because as developers we cannot perform operations that might impact server resources or user management (e.g. webserver, scheduler, worker, etc), but all commands related to monitoring, processing and testing DAGs are supported in the current version.
To check the full list of supported and unsupported commands, refer to the official User Guide. At the time of writing, this is the status of different commands:
List of supported commands
- backfill
- clear
- dag_state
- delete_dag
- list_dag_runs
- list_dags
- list_tasks
- next_execution
- pause
- pool
- render
- run
- show_dag
- task_failed_deps
- task_state
- test
- trigger_dag
- unpause
- variables
- version
List of unsupported commands
- checkdb
- connections
- create_user
- delete_user
- flower
- initdb
- kerberos
- list_users
- resetdb
- rotate_fernet_key
- scheduler
- serve_logs
- shell
- sync_perm
- upgradedb
- webserver
- worker
How to trigger a CLI command from Amazon MWAA
To access the Airflow CLI from MWAA, there are four basic steps:
- Authenticate your AWS account via AWS CLI;
- Get a CLI token and the MWAA web server hostname via AWS CLI;
- Send a post request to your MWAA web server forwarding the CLI token and Airflow CLI command;
- Check the response, parse the results and decode the output.
This sounds complicated but is actually a fairly straightforward process. Let’s deep dive and investigate each step in detail.
1. Authenticate to your AWS account
To access your MWAA cluster, you must install and configure AWS CLI, granting access to the account where your environment is deployed.
If you are not used to this process, read the AWS CLI User Guide, which explains how you can configure a profile in your AWS CLI and grant access to your accounts.
2. Get CLI token and MWAA web server hostname via AWS CLI
The next step is to collect a CLI Token which is a Bearer token used for authentication in your MWAA environment. When first authenticating in the AWS account we can also authenticate to the MWAA environment and collect the token which grants access to perform Airflow CLI commands, by entering the following command :
aws mwaa create-cli-token --name $MWAA_ENVIRONMENT
Remember to assign the name of your MWAA environment by exporting the environment variable $MWAA_ENVIRONMENT.
export MWAA_ENVIRONMENT=my_environment_name
If the command is successfully executed, you should receive a JSON response with two attributes:
{
  "CliToken" : "",
  "WebServerHostname" : ""
}
Parse the results and store them in other environment variables for later use. I suggest the following names:
- $CLI_TOKEN
- $WEB_SERVER_HOSTNAME
3. Send a post request to your MWAA web server forwarding the CLI token and Airflow CLI command
Finally, using the CLI token and the web server hostname, you can trigger your Airflow CLI command via curl request by following the example below:
curl \
  --request POST "https://$WEB_SERVER_HOSTNAME/aws_mwaa/cli" \
  --header "Authorization: Bearer $CLI_TOKEN" \
  --header "Content-Type: text/plain" \
  --data-raw "$AIRFLOW_CLI_COMMAND"
Notice we assigned the environment variables acquired from the previous step ($CLI_TOKEN and $WEB_SERVER_HOSTNAME) and also published a third variable with the name $AIRFLOW_CLI_COMMAND. In this variable we send the Airflow command to be performed by the CLI, for example, if you want to execute the following command:
airflow list_dags
The variable $AIRFLOW_CLI_COMMAND should be filled with:
list_dags
Important note: if your MWAA environment is published in a private network you can’t perform the curl request via public internet; a VPN must be used to establish the connection between your local machine and the VPC endpoint, or you may need to execute this command from another computing resource placed inside of the same VPC.
4. Check the response, parse the results and decode the output
Finally, the last step is to parse and decode the output of the curl request. If everything went well you should have received a JSON response with the following attributes:
{
  "stderr" : "",
  "stdout" : ""
}
Notice both attribute values are encoded in Base64. Remember to decode the results to collect the final output from Airflow CLI. A simple way to achieve that is by using the command:
base64 -d
Automating all the steps with a single script
In the previous sections we discussed all the steps needed to run a CLI command in MWAA, but now I’ll describe how to combine everything in a single script which enables you to quickly and easily perform CLI calls.
This is a shell script created for Unix based operational systems (e.g. Linux, MacOS); if you are running Windows you may need to adapt this content or run the script through Windows WSL (Windows Subsystem for Linux).
Notice I am using jq to parse the JSON responses from AWS CLI and the curl request to MWAA, but feel free to adapt the code if you prefer another approach.
The script above collects all the arguments and send it to the curl request by using the variable $*. So, if we name this script as airflow-cli.sh and you type the following command in your terminal:
airflow-cli.sh list_dag_runs my_dag_name
The MWAA environment will perform the following CLI command:
airflow list_dag_runs my_dag_name
An interesting trick to improve the user experience is to rename this script as airflow and copy it to one of the folders mapped in the local $PATH (e.g. /usr/local/bin/airflow). In this way you can call the commands in the Airflow CLI by typing:
airflow <arguments>
Just ensure you don’t have the real Airflow CLI installed, to avoid conflicts.
If you already have Airflow CLI installed, another option is to run this script from a Docker image and map it to the container local path.
Conclusion
Amazon MWAA is an incredible service which reduces the complexity of managing an Apache Airflow cluster, thus enabling Data Engineers to focus on DAGs and the data workflow instead of spending endless time on infrastructure.
The Airflow UI continues to be the primary means of interaction with MWAA, but the additional option of using Airflow CLI allows advanced users to maximise the benefits of MWAA, and take advantage of all the features of a hosted solution.
I hope you enjoyed this content and make good use of this script in your Amazon MWAA environment!
References:
- Amazon Managed Workflows for Apache Airflow — User Guide: https://docs.aws.amazon.com/mwaa/latest/userguide/amazon-mwaa-user-guide.pdf
- Using a CLI token: https://docs.aws.amazon.com/mwaa/latest/userguide/access-airflow-ui.html#CreateCliToken
At DNX Solutions, we work to bring a better cloud and application experience for digital-native companies in Australia.
Our current focus areas are AWS, Well-Architected Solutions, Containers, ECS, Kubernetes, Continuous Integration/Continuous Delivery and Service Mesh.
We are always hiring cloud engineers for our Sydney office, focusing on cloud-native concepts.
Check our open-source projects at https://github.com/DNXLabs and follow us on Twitter, Linkedin or Facebook.